

Here's the 3rd blog of this series that covers Building a Full Stack Web Application using Next JS.
We would essentially use Next.js, Firebase & MongoDB to design the data and to store and retrieve the Data and Images.
Before you read further, make sure to checkout my Previous Blog on this series.
Making Components:
We will be starting off by designing a sample Home page. But first we will be adding different components and then finally import them to our Home page.
First, install "react-bootstrap" and "bootstrap" to your project:
npm i react-bootstrap bootstrap
Step 1:
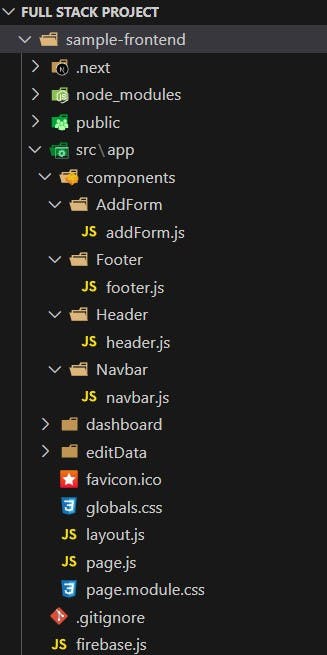
Inside "src/app" add a new folder namely "components".
Further add some folders such as : Navbar, Header, AddForm, Footer. Inside these folders add new files with same name.
Step 2:
Start adding the code for components.
Refer below to get an idea of using "react-bootstrap" & "bootstrap" to design the components.
Step 3:
You need to add code inside all the files.
Here's a method to save your time. Simply visit my GitHub repository: https://github.com/Sujal-2820/Full-Stack-Web-Application.git
This is a newly added project containing an intermediate Frontend code for learning purpose
Fork the repository.
Make a New Folder inside your Local System.
Open the folder inside any Code Editor (e.g. VS Code)
Clone this repository using the following command inside the "Terminal" of VS Code.
git clone https://github.com/Sujal-2820/Full-Stack-Web-Application.gitYou will get all the code pre-settled inside your folder.
Use the Command "npm install" to install all the dependencies for your project to run.
Further use the command "npm run dev" in order to run the project.
You are all set with the basic frontend structure of Next.js and your project is up and running now 🥳.
Important aspects to focus on in the file structure:
page.js (src/app/page.js):
In Next.js, the
page.jsfile in thesrc/appdirectory plays a crucial role in shaping your application's layout. It orchestrates how different components come together to build your pages.
It looks somewhat like this in every next.js project:
// event/src/app/page.js
'use client'

import React from 'react';
import NavbarComponent from './components/Navbar/navbar';
import 'bootstrap/dist/css/bootstrap.min.css';
import HeaderComponent from './components/Header/header';
import AboutComponent from './components/About/About';
import Footer from './components/Footer/footer';


const Home = () => {

    return (
      <>
        <NavbarComponent/>
        <HeaderComponent/>
        <br/>
        <AboutComponent/>
        <br/><br/>
        <Footer/>
      </>
    )
  }

  export default Home;
In this file, we define the layout of our home page. It brings together components like the Navbar, Header, About section, and Footer seamlessly.
layout.js (src/app/layout.js):
In Next.js, the
layout.jsfile serves as a foundational piece for structuring your application's overall appearance and behavior.layout.jsis where we define the basic layout structure for our application. It sets up fundamental aspects like the HTML structure and global styles, ensuring consistency across all pages.components folder (src/app/components):
Within a Next.js project, the
componentsfolder serves as a hub for encapsulating reusable UI elements and functionalities.// Example structure of the components folder /components /Header Header.js /Footer Footer.js /Button Button.js"use client" :
In Next.js, the "use client" directive is a special comment used to specify the environment in which a page component should run.
Following is an example of usage of "use client" directive:
```javascript "use client";
import React, { useEffect, useState } from "react"; import "./dashboard.css"; import Image from "next/image";
function DashboardPage() { const [sortBy, setSortBy] = useState("");
const handleSortChange = (event) => {
setSortBy(event.target.value);
};
return (
<>
Topic Selection
//Some code for dashboard page </> ); }
export default DashboardPage; ```
In the further parts of this series "Building Full-Stack Web Application using Next.js" I would be covering the following:
Setting up the Backend Servers 🗃️
Integrating MongoDB with Backend 📥📤
Connecting Frontend to Backend and testing the whole project run 🏃♂️
Deploying the project globally to make it shareable 🌐
In case of any doubt, you can reach out to me via LinkedIn 👨💻
You can also connect with me on various other platforms like Twitter, GitHub
If you liked this Blog, make sure to give it a 💟 and do Follow me on this platform to get notified for my next blogs in this series.
Happy Coding!! 😊