


Elevate Your API Testing: A Hands-On Guide
As a passionate MERN stack developer, I thrive on crafting seamless user experiences. An essential tool that empowers my development journey is Postman. In this blog, I'll walk you through the intricacies of using Postman effectively for API testing, sharing my experiences and insights gained from years of hands-on practice.
Key Features of Postman
Postman is more than just an API testing tool; it's your partner in ensuring robust backend functionality. Some key features include:
User-Friendly Interface: Postman's intuitive UI streamlines the process of creating, sending, and analyzing API requests.
Collections and Environments: Organize requests into collections and set up environments for different stages (dev, test, prod).
Automated Testing: Leverage built-in testing scripts to validate API responses and automate regression testing.
Mock Servers: Simulate server responses, enabling frontend development to progress independently.
Documentation Generation: Generate interactive API documentation to foster collaboration between frontend and backend teams.
Collaboration and Sharing: Share collections with team members for seamless collaboration.
Practical Implementation
Let's delve into practical implementation with CRUD operations. I'll guide you step by step through Create, Read, Update, and Delete operations, demonstrating how to structure requests, handle responses, and ensure data integrity.
1. Open Postman: Launch the Postman application. If you don't have it installed, you can download it from the Postman website.
2. Choose POST Request: In the Postman window, you'll see a field to enter the URL. Select the HTTP method "POST" from the dropdown next to the URL field.
3. Enter the URL: Paste the URL you want to send the POST request to in the URL field. This URL usually corresponds to the endpoint where you want to create or submit data.
4. Set Headers (Optional): Headers provide additional information about the request. For a POST request, you might need to set the "Content-Type" header to specify the format of the data you're sending. Common values are "application/json" for JSON data and "application/xml" for XML data.
5. Input Data: Navigate to the "Body" tab just below the URL field. Here, you'll define the data you want to send in the POST request. You can choose from various formats like JSON, form-data, x-www-form-urlencoded, and raw (which includes options like JSON and XML).
6. JSON Data: If you're sending JSON data, select the "raw" option and choose "JSON (application/json)" from the dropdown. Then, input your JSON data in the text box. For example:
{
    "employee": {
        "name":       "sonoo",
        "salary":      56000,
        "married":    true
    }
}
7. XML Data: For XML data, similarly select the "raw" option and choose "XML (application/xml)" from the dropdown. Then, input your XML data in the text box. For example:
<user>
    <name>John Doe</name>
    <email>john@example.com</email>
</user>
8. Send the Request: With your URL, headers, and data set up, click the "Send" button. Postman will send the POST request to the specified URL with the provided data.
9. Observe Response: Once the request is sent, you'll see the response in the lower part of the Postman window. The response will include information about the HTTP status code, headers, and the body of the response from the server.
CRUD Operations in Postman
1. Create (POST Request): Creating new data involves sending a POST request with the data you want to add. Here's how:
Open Postman.
Select "POST" from the dropdown next to the URL field.
Paste the URL for creating new data (e.g.,
/api/users).In the Headers section, set the "Content-Type" header to "application/json" (if dealing with JSON data).
Navigate to the "Body" tab, select "raw," and choose "JSON (application/json)" from the dropdown.
Enter your JSON data in the text box and click "Send."

2. Read (GET Request): Reading data involves sending a GET request to retrieve existing data. Here's how:
Open Postman.
Select "GET" from the dropdown next to the URL field.
Paste the URL for fetching data (e.g.,
/api/posts).Click "Send."

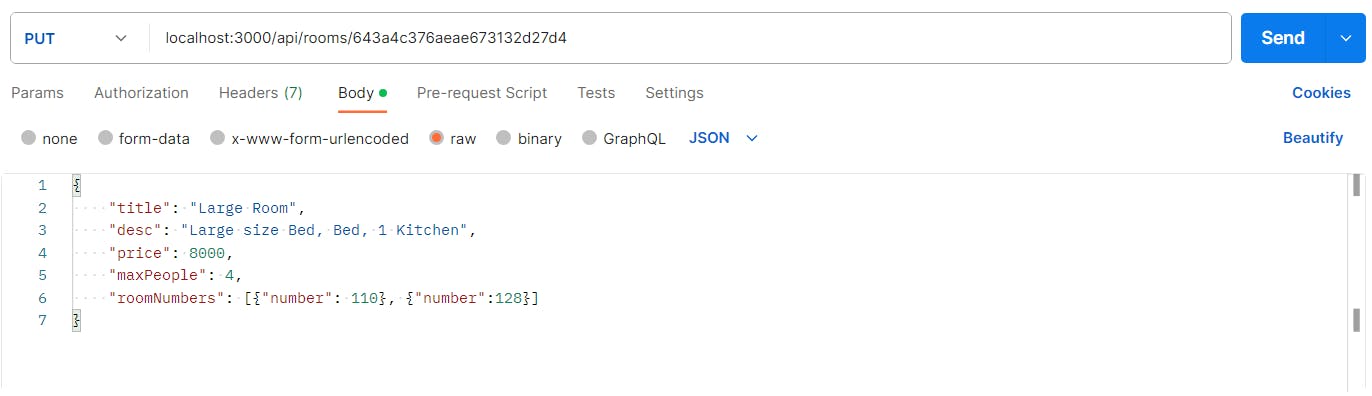
3. Update (PUT Request): Updating data requires sending a PUT request with the modified data. Here's how:
Open Postman.
Select "PUT" from the dropdown next to the URL field.
Paste the URL for updating data (e.g.,
/api/products/123where 123 is the ID of the product to update).In the Headers section, set the "Content-Type" header to "application/json" (if dealing with JSON data).
Navigate to the "Body" tab, select "raw," and choose "JSON (application/json)" from the dropdown.
Enter your updated JSON data in the text box and click "Send."
4. Delete (DELETE Request): Deleting data involves sending a DELETE request to remove existing data. Here's how:
Open Postman.
Select "DELETE" from the dropdown next to the URL field.
Paste the URL for deleting data (e.g.,
/api/orders/456where 456 is the ID of the order to delete).Click "Send."

Handling Errors and Troubleshooting
Reality check: even pros face errors. Fear not, we're in this together! Embrace HTTP status codes and dissect error messages.
Following are some Examples:
404 Not Found: Resource vanished?
500 Internal Server Error: Let’s find that sneaky bug!
Here are some more that I came across:
400 Bad Request: The server couldn't understand the request due to malformed syntax or other client-side errors. Double-check your request structure and data.
401 Unauthorized: The request lacks valid authentication credentials or the provided credentials are invalid. Ensure you have the necessary authentication tokens or API keys.
403 Forbidden: Although authentication credentials are valid, the server refuses to authorize the request. You might not have the required permissions to access the resource.
405 Method Not Allowed: The requested HTTP method (GET, POST, PUT, DELETE, etc.) is not supported by the resource. Review the API documentation for the correct HTTP method.
422 Unprocessable Entity: The server understands the request, but the provided data violates business logic rules or validation checks. Check the requested data for errors.
429 Too Many Requests: You've exceeded the rate limit for the API. The server is telling you to slow down and wait before sending more requests.
503 Service Unavailable: The server is temporarily unable to handle the request due to maintenance or overload. Wait for a while and try again later.
Conclusion
Congratulations 🥳, you have now got the true essence of Postman for API testing! As you embark on this exciting journey, know that I'm here to accompany you. If you're craving more insights or wish to share your own experiences, reach out on LinkedIn. Let's transform API testing into an adventure worth embarking upon together! 👨🏻💻